Python#
In order to execute Python code for completing assignments, we will need to install a Python distribution with the necessary packages. One option is to use conda, a cross-platform, open-source package management system which can be installed using Miniconda (a lightweight version of Anaconda).
Install Miniconda#
The latest version of Miniconda for your operating system can be installed from the download page.
Test installation#
After installation is complete, we can test that the package manager conda works by opening an Anaconda Prompt (miniconda3) (Windows) or Terminal (macOS).
In the command prompt (or Terminal) run the following:
conda --version
If the command returns a version number of conda (e.g. conda 22.11.1) everything is working correctly.
Setup virtual environment#
It is good practice to create a virtual environment for each new programming project (e.g. this class). A virtual environment allows us to install Python packages for one project without worrying about conflicts with packages of other projects. Python has built-in support for virtual environments using the venv module. To create a new environment by running the following command in an Anaconda Prompt (miniconda3) (Windows) or Terminal (macOS):
python -m venv .gds
That creates an environment called .gds (which stands for Geospatial Data Science) in your root directory. All Python packages (or dependencies) for this course will be installed in this folder. Note that we could name this environment anything we like or create it in our course folder.
Next we need to activate the virtual environment. In Windows this can be achieved by running:
.gds\Scripts\activate
On macOS, run:
source .gds/bin/activate
Install requirements#
We can install individual Python packages using pip. The syntax is pip install xxx where xxx is the package we want to install. It’s often easier to install multiple packages at once using a text file, so that anyone else setting up the project will have exactly the same environment. The requirements.txt file for this course can be downloaded from here.
We can install requirements.txt by opening an Anaconda Prompt (miniconda3) (Windows) or Terminal (macOS), navigating to the file (i.e. cd Downloads) and running the following command:
pip install -r requirements.txt
Note
This may take a few minutes.
Coding time!#
Once we have setup our virtual environment that contains the packages we need for this course, we can start coding. In this class, we will write code and complete assignments using Jupyter Notebooks which can be opened by running:
jupyter notebook
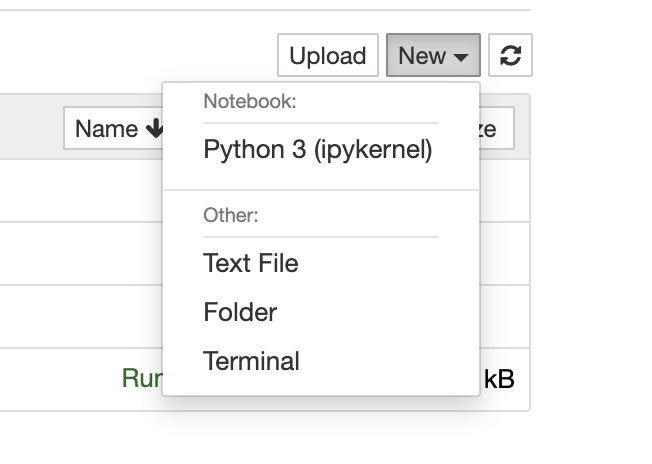
Navigate to your course folder and open a new notebook by clicking New → Python 3 (ipykernel).
We can make sure everything installed properly by running:
import numpy as np
If this runs without errors we are all set to code!
Deactivate environment#
When we are finished with coursework, it is good practice to deactivate the virtual environment in the Anaconda Prompt (miniconda3) (Windows) or Terminal (macOS) by running:
deactivate